Compounding Tips
Tip #1: Steps to reduce electrostatic charges when manipulating powders
Consider the following options to reduce static charges when working with dry powders:
- Use anti-static vessels when weighting powders (e.g. anti-static weigh boats ,anti-static weigh canoes, and/or weigh papers).
For regular release capsules, consider using an excipient blend that is specially formulated to reduce static and increase flowability (e.g. use Capsublend-S, Capsublend-H or Capsublend-P)
Use an anti-static brush (e.g. staticwisk brush) to neutralize electrostatic charges from clean equipment (e.g. electronic balance or capsule machine)
Use a low-static mixing method, such as a tumbler mixer (e.g. Inversina) to homogenously mix dry powders.
Place powders in the freezer for a short period, with the exception of APIs that are sensitive to freezing temperatures.
Use an ionizer bar or demagnetizer at entrance of electronic balance.
Increasing room humidity (while keeping it within the accepted 40-60% range) can correct problems of capsules clinging to each other and/or to plastic surfaces, due to static electricity.
NOTE: It is important to take into consideration the compatibility between excipients, active pharmaceutical ingredients, and equipment when choosing an electrostatic-reduction option.
Allen Jr, L. V. "Basics of compounding: Tips and hints: Powders, Capsules, Tablets, Suppositories, and Sticks, Part 1." International Journal of Pharmaceutical Compounding 18.1 (2014): 42-45.
Allen, Loyd V., and M. A. Erickson. "Secundum Artem." Current and Practical Compounding Information for the Pharmacist. Pharmaceutical Compounding Resources on the Internet 10.1 (2009).
Tip #2: Selection of suppository base as a function of desired release rate of drug
The following table provides a general summary of the relationship between drug solubility, property of suppository base and drug release rate:
| Relationship between drug solubility, property of suppository base and drug release rate | ||
| Drug | Oily base (e.g. SPG supposi-base, witepsol) | Water-soluble/miscible base (e.g. polypeg suppository base) |
| Oil-soluble drug | Slow release rate; poor escaping tendency | Moderate release rate |
| Water-soluble drug / miscible drug | Rapid release rate | Moderate release rate; based on diffusion; all water soluble |
Allen Jr, L. V. (2000). The Basics of Compounding: Compounding Suppositories: Part One-Theoretical Considerations. International journal of pharmaceutical compounding, 4(4), 289.
Tip #3: Use of tracer dye to help visually assess homogeneity in power blends
View this instructional video regarding the appropriate technique for geometric dilution on the LP3 Network website.
Consider the addition of a tracer dye (e.g. FD&C red No.3, FD&C blue No.1) when compounding powder blends, as it is often difficult to visually inspect and assess homogeneity during mixing, especially when all of the ingredients are the same color. The use of a tracer dye can help a compounder to:
- Visually inspect the final preparation for homogeneity:
- If the color is evenly distributed, in combination with proper geometric dilution and sufficient mixing times, it can be assumed that homogeneity has most likely been achieved.
- If streaking or uneven color in the powder blend is observed, it can be assumed that homogeneity has not yet been achieved. -
Validate various mixing equipment and methods of mixing during the process development of a formula.
-
Make stock powder blends, especially those containing active pharmaceutical ingredients (APIs) that have a narrow therapeutic index.
-
Train new staff on mixing and blending techniques.
Remember, the two most important factors that contribute to the homogeneity of powder blends are:
- Ensuring that the powders are mixed for a sufficient amount of time as increasing mixing times increases the likelihood of a more homogenous blend and that
-
Powders are mixed using proper geometric dilution.
The addition of a tracer dye, when used with the two aforementioned factors, can help visually asses when a powder blend has been mixed homogenously.
Kumar, A. et al. (2012) . Selection of Color Additives: A Regulatory View. International journal of pharmaceutical compounding, 16(4), 304-309.
Hoffmann, B. et al. (2014). Assessing the Use of Food Coloring as an Appropriate Visual Guide for Homogenously Mixed Capsule Powders in Extemporaneous Compounding. International Journal of Pharmaceutical Compounding, 18(4), 341-344.
Tip #4: Steps to effectively triturate a powder
View this instructional video about the appropriate technique for triturating powders on the LP3 Network website.
Many active pharmaceutical ingredients (APIs) are available in micronized form, which means that the particle size has already been reduced and further trituration by the compounder is not necessary. Benefits for reduction in particle size allows for increased solubility and/or better incorporation into emulsions of finished compounded preparations. For APIs that are not available in micronized form, the compounder can use trituration methods to reduce the particle size of powdered ingredients. The following steps should be followed to effectively triturate a powder:
- Place the desired powder into a mortar and pestle (e.g. Mortar & Pestle Flint Glass, 4oz). Be sure to use a mortar and pestle that allows enough room for the powder to move freely but is not so large that the powder is spread too thin. Always use a mortar and pestle made of the same material, and that match in size.
Firmly grip the pestle with one hand and firmly keep the mortar in place with the other hand.
Apply sufficient force against the sides and bottom of the mortar while stirring the powder in circular motions. Repeat moving in the opposite direction.
- This allows for the grinding of the powder between the mortar and pestle and ensures all powder comes in contact with the mortar and pestle.
- Continue mixing and grinding until a fine homogeneous powder is achieved.A soft rubber spatula (e.g. Spatula 9") helps remove powder from the sides of the mortar during trituration and when removing powder from the mortar and pestle after trituration is complete. Never use a hard plastic or metal spatula on any mortar or pestle.
Since powder can be lost during the trituration process, consider triturating a little more powder than required. After trituration, weigh the exact amount of powder required from the triturated material.
Allen Jr, L. V. (2001). The Basics of Compounding: Powders and Granules. International Journal of Pharmaceutical Compounding 5(1):36-39.
Tip #5: Correct weighing techniques for powders
View this instructional video about correct weighing technique on the LP3 Network website.
Using correct weighing techniques improves efficiency, helps avoid spills and potential cross-contamination, as well as reduces unnecessary ingredient waste during the weighing process. Outlined below are some common issues encountered when weighing powders. The corresponding solutions promote efficient and safe weighing practices.
- Issue: using a flat round-tip spatula to weigh powders; powders tend to fall off the sides of the spatula and spill onto the balance. The rounded tip also makes it difficult to remove or add small amounts of powder when nearing the desired weight.
- Solution: use a v-shaped lab scoop (e.g. Lab Scoop 6.5") with a pointed tip that will contain powders and allow transfer of small quantities of powders when nearing desired weight. Issue: tapping or pouring powders directly from container onto balance; this action creates a lot of airborne particles and greatly increases the potential for spills and ingredient waste.
- Solution: use a lab scoop, as outlined above. For removing powders from small containers, consider using a thin lab scoop (e.g. Micro/Mini Spatula 6.5").Issue: carrying powders on scoop from the container onto the balance, starting outside of the draft shield; powders will fall and spill inside and outside of balance, plus this process can be very time-consuming when moving powders carefully.
- Solution: don’t place the balance too far back in powder containment hood, instead make sure it is within comfortable reach without having to overextend ones’ arms. Ensure both sides of the draft shield are open. Hold the lab scoop with your dominate hand and container in the other. Insert both hands into draft shield and weigh powder over balance pan. The distance from the mouth of the container to the weigh paper or weigh boat has now been greatly reduced.Issue: holding the lab scoop at the very end and using index finger of the same hand, to tap the lab scoop; the scoop experiences a large range of movement and this leads to less control over the quantity of powder that falls onto the weigh boat or weigh paper.
- Solution: move your hand down the length of the lab scoop so that it is closer to the powder for more control. If it is more comfortable to hold the end of the lab scoop, then use your second hand to lightly tap the hand holding the lab scoop. This also allows for more controlled movement so that powders can be added slowly.
Once you have weighed your powder, always remember to fully close your draft shield and wait for the balance to settle on a weight, in order to get an accurate reading.
Compounding Equipment. In: Allen, LV, Jr. The Art, Science and Technology of Pharmaceutical Compounding Fourth Edition. American Pharmaceutical Association; 2012: 55.
Tip #6: Leveling an electronic balance
View this instructional video about leveling a balance on the LP3 Network website
Among many daily tasks that compounders must complete, one of the most crucial involves making sure the electronic balance (e.g. OHAUS Adventurer AX balance) is level prior to performing any calibration procedures. In order to properly level a balance, the following steps should be followed:
- Select the most suitable location for your electronic balance and make sure it is on a level surface.
- An unleveled balance can produce incorrect weight readings leading to weighing either too much or too little of your ingredients. The level indicator on the electronic balance indicates the balance is level when the air bubble is within the circle on the indicator; ideally when it is perfectly centered in the middle of the circle.
Every electronic balance will have either two or four adjustable feet that will allow you to modify the height of the balance to compensate for any minor imperfections of the countertop.
- To decrease the height of the balance feet, you would turn the feet counterclockwise.
- To increase the height of the balance feet, you would turn the feet clockwise.
- Begin with all the feet at the lowest position and check the position of the air bubble in the level indicator. The position of the air bubble will let you know how the balance height needs to be adjusted; whether or not the front or back feet and/or the left or right side needs to be adjusted.
Using these simple guidelines, compounders can adjust the feet of the electronic balance to ensure it is level according to the level indicator. Once this has been completed, the balance can be calibrated. Compounders should always consult the user manual for any manufacturer/model specific information.
Wesolowski, Paul. (2003). Technology Spotlight: Electronic Balances with Printer and Draft Shield. International Journal of Pharmaceutical Compounding, 7(2), 120.
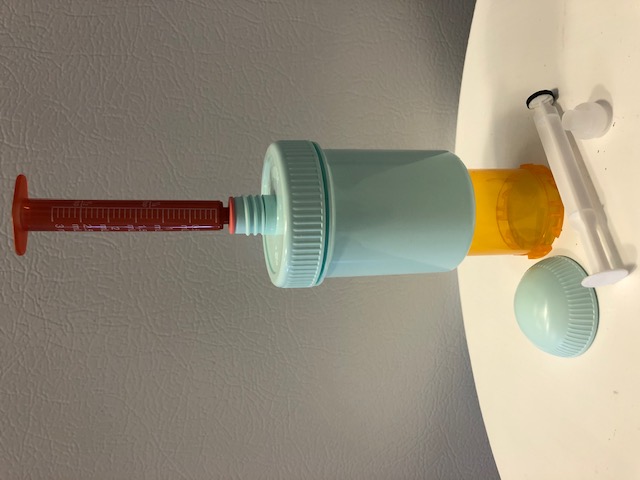
Tip #7: How to effectively fill an oral/topical syringe with cream or gel using a Samix jar
Filling syringes with cream or gels can be time-consuming and frustrating because it is essential to remove all visible air bubbles from the syringe. Any air pockets, even seemingly small ones, will affect the delivered dose. A Samix jar fitted with a nozzle (e.g., Nozzle, Samix, 4mm, Pink) facilitates this process as Samix jars are unique due to a sliding bottom and a dispenser opening incorporated into the lid. For most patients, multi-dose pre-filled syringes are easy to use, but dosing can be difficult for patients suffering from vision impairment or if appropriate counselling is not provided. To help facilitate administration, use an amber syringe (e.g., Precisedose Dispenser 3 mL) that is accurate, has a secure cap, a black plunger tip and graduated markings that correspond to the prescribed dose (most syringes have 0.1 or 0.2 mL increments). The amber color not only protects light-sensitive ingredients, but it provides a contrast to the color of the cream or gel allowing the patient to see the markings on the syringe more clearly. Colored tip caps (e.g., Precisedose Dispenser Tip Cap Purple) are available to help with product identification. Finally, a light resistant bag (e.g., Zip-Lock Bag Amber, 6"x 8") can be used to dispense syringes to patients, unless a child-resistant option is required (then a tall amber vial with a child-resistant lid can be used).
Front-filling a syringe using a Samix jar:
1. Tap Samix jar firmly to settle contents and to remove any large air pockets
2. Remove cap from smaller, dispensing lid and insert 4 mm nozzle.
3. Remove plunger from syringe and insert syringe tip into nozzle
4. Push the sliding base of the jar up, which in turn will force the cream through the nozzle and into the front of the syringe. For viscous preparations or larger batch sizes, place a plastic prescription vial face down onto the counter. Be sure to use a vial that is narrower than the diameter of the jar. Place the bottom of the jar over the vial and push down on the jar. It is easier to push down on the jar and let the vial push up the sliding bottom, than to push the sliding bottom up directly with one’s hands.
5. Push until the cream goes almost to the very end of the syringe. Do not stop at the last marked graduation.
6. Use a small LED flashlight to check for air pockets. Tap syringe gently on counter to remove any air. Add additional cream, if necessary.
7. While the syringe is attached to the Samix jar, carefully insert the plunger tip into the barrel of the syringe. Use a rubber spatula (e.g., Spatula 9") to remove any product that may have been displaced by the plunger tip. There should be no air between the plunger tip and product.
8. Push plunger until it reaches the nominal volume of syringe (or to the desired fill volume). The excess cream is returned to the Samix jar.
9. Cap syringe and perform a final check for air bubbles and fill-quantity
10. Label the base of each syringe with a flag-type label that indicates contents and concentration of active ingredients
11. Place full prescription label on zip-lock bag or child-proof container
See image for example:
Tip #8: Masking bitter APIs
Certain APIs have a strong bitter taste that is exceptionally hard to mask. Flavoring and Sweetening agents play a huge role in helping with palatability of these drugs. When compounding with bitter APIs, consider the following combination of ingredients by using a flavor + a neutralizing flavor + either a sweetening agent, sweetening enhancer or bitterness reducing agent/suppressor in the recommended concentrations below:
- Adding a flavor, such as mango, grape, raspberry, cherry, strawberry, banana, bubblegum or orange, in a quantity of 0.2%-2%.
Adding a neutralizing flavor, such as vanilla or marshmallow, in a quantity of 0.2%-0.5%.
Adding a sweetening agent, such as stevia (stevioside), in a quantity of 0.2%-1% in aqueous formulations and 1%-2% in oil formulations.
Adding sweetening enhancer, in a quantity of 1%-4% in aqueous formulations.
Adding bitterness suppressor (liquid) to liquid formulations, in a quantity of 1%-2%, or bitterness reducing agent (powder) to solids formulations, in a quantity of 0.2%-0.5%.
Momin, Munira, S. Rathod, and S. Kar. (2012). Taste masking techniques for bitter drugs-an overview. Int J Pharm Technol, 4(2),2100-18.
Abraham, Jijo., and Flowerlet. Mathew. (2014). Taste masking of paediatric formulation: a review on technologies, recent trends and regulatory aspects. Int J Pharm Pharm Sci, 6(1), 12-19.
Tip #9: How to compound slow release capsules
Slow-release (SR) capsules are a commonly prepared compounded dosage form in which the drug is intended to release over a period of time. Unlike manufactured extended-release capsules, compounded slow-release capsules do not have an exact time of release. Therefore, it is important if converting a patient from an extended-release capsule to a compounded SR capsule, to make both the prescriber and patient aware of possible initial serum fluctuations and monitor the patient accordingly.
SR compounded capsules are made by the addition of a pre-determined amount of Hydroxypropyl methylcellulose (4000 mPa.s) or Hypromellose (4000 mPa.s),alongside another filler, like Microcrystalline Cellulose, which comprises the remaining amount of total filler needed.
General guidelines for the amount of Hypromellose (4000 mPa.s) required to compound SR capsule depends on the solubility of the API and/or it’s Biopharmaceutics Classification System (BCS):
- If the API is solubleand/or has a BCS Class I or Class III, Hypromellose (4000 mPa.s) should be added at 40% of the capsule fill volume.
If the API is not soluble and/or has a BCS ClassII or IV, Hypromellose (4000 mPa.s) should be added at 35% of the capsule fill volume.
Refer to a free sample formula in the https://www.medisca.com/formulas/library/samples section for the steps and calculations required to compound SR capsules.
Li, C., Martini, L., Ford, J., & Roberts, M. (2005).The use of Hypromellose in oral drug delivery. Journal of Pharmacy And Pharmacology, 57(5), 533-546. doi: 10.1211/0022357055957
Radojkovic, B., Milic, J., & Calija, B. (2012). Compounding of slow-release Niacinamide capsules: Feasibility and Characterization. International Journal of Pharmaceutical Compounding, 16(5), 434-437
Vu, N., Kupiec, T., & Raj, V. (2009).Compounding Slow-Release Pharmaceuticals. International Journal Of Pharmaceutical Compounding, 13(2), 144-145.
Zur, E. "Compounding slow-release capsules: a comprehensive review and an Excel spreadsheet for faster calculations of excipients." International journal of pharmaceutical compounding 17.1 (2013): 10-22.
Tip #10: How to compound rapid dissolve tablets
Rapid dissolve tablets, also known as orally disintegrating tablets (ODTs), are designed to dissolve quickly on the tongue or via the buccal pouch without water. This dosage form offers solutions to patients that have trouble or difficulty swallowing tablets, such as in the pediatric and geriatric population.
Medisca's Medi RDT base offers a quick and simplified solution for these patients. This base is only slightly sweetened, therefore it is recommended to add one or multiple flavors to the formula, in a quantity of 0.2%-0.5% and up to 1%, and additional stevia (stevioside), if required.
The following are the steps involved in compounding rapid dissolve tablets:
- Accurately weigh out, triturate and sieve the API(s) and other excipients. Please note: all APIs/excipients used in RDTs must be stable at 110°c for the time duration needed.
Sieve the required amount of Medi-RDT base. DO NOT triturate Medi-RDT base. Complete a mold calibration in order to determine the amount of base needed.
Mix all of the ingredients until homogeneous then fill the cavities with the powder. Use a tamper plate to press down the powder then continue filling the cavities with the remaining powder until they are completely full.
Place the filled mold in a preheated convection oven at 110°c for 15 minutes or the designated time indicated on the formula.
Once out of the convection oven, let the mold rest for 1-2 minutes then carefully flip the mold upside down. Use a mini-mallet to gently tap on all sides of the mold to release the tablets.
Package the finished RDTs in the Medi-RDT blister packs.
Please view the below documents for more details.
Tip #11: How to extract oxytocin powder from Medisca’s 10 mg bottle
Oxytocin powder can be difficult to extract from its container due to its hygroscopic nature.
To remove all of the oxytocin powder from Medisca’s 10 mg bottle, the following steps can be followed:
- Prepare a water/alcohol solution by combining and mixing the following ingredients together:
3 mL Alcohol (95%), USP
1 mL Purified Water, USP Add 0.5 mL of the water/alcohol mixture to the bottle of oxytocin.
Close cap tightly and mix gently but thoroughly for 60 seconds to “rinse” the bottle.
Obtain the weight of an empty weigh boat (e.g. small black weigh boat, as powder is easily visible as opposed to a white weigh boat) and then pour the contents from step 3 into it.
Repeat the “rinsing” procedure two additional times.
Place the weigh boat overnight in a controlled and undisturbed environment to allow the liquid to evaporate completely.
Weigh the powder that remains after drying, taking into account the weight of the empty weigh boat. A balance reaching 4 decimal points is required to accurately weigh the powder.
Oxytocin (Monograph). In: O’Neil MJ. The Merck Index 15th Edition. Whitehouse Station, NJ: Merck & Co, Inc.; 2013: 7078.
USP <795>. United States Pharmacopeia XLIII / National Formulary 38. Rockville, MD. US Pharmacopeial Convention, Inc. 2020: 7025.
Tip #12: Desiccated thyroid equivalent table
| Approved commercial desiccated thyroid tablets (porcine) – UNITED STATES | ||||
| Armour thyroid | NP-thyroid | Nature-thyroid, westhroid | Levothyroxine | Liothyronine |
| 1/4 grain (15mg) | 1/4 grain (15mg) | 1/4 grain (16.25mg) | 9.5 mcg | 2.25 mcg |
| 1/2 grain (30mg) | 1/2 grain (30mg) | 1/2 grain (32.5mg) | 19 mcg | 4.5 mcg |
| 3/4 grain (48.75mg) | 28.5 mcg | 6.75 mcg | ||
| 1 grain (60mg) | 1 grain (60mg) | 1 grain (65mg) | 38 mcg | 9 mcg |
| 1 1/4 grain | 47.5 mcg | 11.25 mcg | ||
| 1 1/2 grain (90mg) | 1 1/2 grain (90mg) | 1 1/2 grain | 57 mcg | 13.5 mcg |
| 1 3/4 grain | 66.5 mcg | 15.75 mcg | ||
| 2 grain (120mg) | 2 grain (120mg) | 2 grain | 76 mcg | 18 mcg |
| 2 1/4 grain | 85.5 mcg | 20.25 mcg | ||
| 2 1/2 grain | 95 mcg | 22.5 mcg | ||
| 3 grain (180mg) | 3 grain | 114 mcg | 27 mcg | |
| 4 grain (240mg) | 4 grain | 152 mcg | 36 mcg | |
| 5 grain (300mg) | 5 grain | 190 mcg | 45 mcg | |
| Approved Commercial Desiccated Thyroids (Porcine) - CANADA | ||
| EFRA Thyroid | Levothyroxine | Liothyronine |
| 30 mg | 18 mcg | 4 mcg |
| 60 mg | 35 mcg | 8 mcg |
| 125 mg | 73 mcg | 17 mcg |
* Porcine derived desiccated thyroid contain a T4:T3 ratio of approximately 4.2:16
1.Dailymed: Armour Thyroid. https://dailymed.nlm.nih.gov/dailymed/drugInfo.cfm?setid=56b41079-60db-4256-9695-202b3a65d13d Retrieved 07/23/2020
2.Rx List: The Internet Drug Index. Westhroid https://www.rxlist.com/westhroid-drug.htm Retrieved 7/23/2020
3.RX List: The Internet Drug Index. Nature-Thyroid. https://www.rxlist.com/nature-throid-drug.htm Retrieved 7/23/2020
4.RX List: The Internet Drug Index. NP-Thyroid. https://www.rxlist.com/np-thyroid-drug.htm Retrieved 7/23/2020
5.EFRA Canada: Thyroid. https://eci2012.net/product/thyroid/ Retrieved 7/23/2020
6.Dayan, Colin, and Vijay Panicker. "Management of hypothyroidism with combination thyroxine (T4) and triiodothyronine (T3) hormone replacement in clinical practice: a review of suggested guidance." Thyroid research 11.1 (2018): 1-11.